หลักการและการใช้งาน Fineness

หลักการและการใช้งาน Fineness

Fineness of Dispersion -- Passing the Test with 3M™ Ceramic Microspheres
วิธีการใช้งานถ้วยวัดความหนืด และการสอบเทียบ

Calibration Demonstration on the EZ Zahn Viscosity Cup.


Hand-held Tensiometer for Process Monitoring and Quality Control


MEASURING THE SURFACE TENSION -
CONTROLLING THE SURFACTANT CONCENTRATION
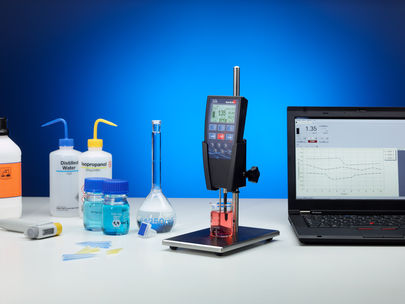
The mobile hand-held Tensiometer measures the surface tension as well as the surfactant concentration easily and quickly in the laboratory and at the production line. It directly shows the measuring results on a comfortable display and alerts the user if defined limit values are exceeded.

PRECISE
Display of surfactant concentration within defined limits
Comparability of measuring values with all SITA lab and process measuring devices
Adjustable high dynamic bubble lifetime range: 15 ms…20.000 ms

    ROBUST
    Patented and optimized capillary for process use
    Robust device housing for atline measurement
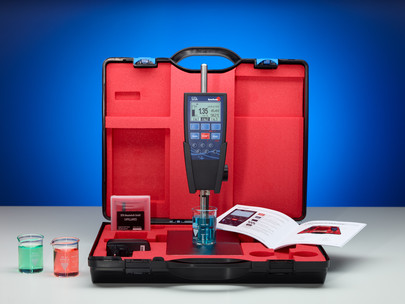
    Comfortable suitcase for transport and device storage, also useful as working surface

      FLEXIBLE
      Intuitive operation: simple and fast measuring as well as controlling
      Mobile hand-held tensiometer: no PC or notebook required
        25 measuring profiles for bath control, process documentation and more

          Application fields


          The DynoTester+ is especially used in following applications:
          -Controlling the surfactant concentration in industrial parts cleaning industry
          -Monitoring the surfactant concentration in electroplating baths
          -Measuring the surface tension of liquids at the plant (atline) or in the laboratory (offline)
          -Quality control of inkjet inks, paints and lacquers/varnishes
          -Incoming and outgoing inspections of surfactant containing goods
          -Mobile use for external work
          For your security our application engineers advise you, if the DynoTester+ is suitable for your application. Furthermore, we test your samples and develop an appropriate controlling procedure according to your processes.
          Result: The DynoTester+ optimally supports you in quality control and process monitoring.
          Here you can find further application examples [..]

          Measuring principle


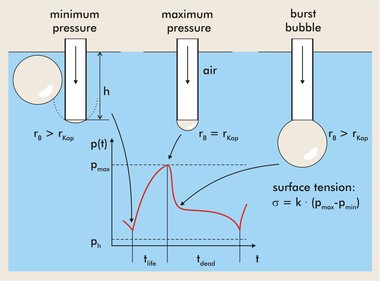
          Like all SITA Tensiometer, the DynoTester+ is based on the bubble pressure method for measuring the dynamic surface tension of liquids.
          The principle of the bubble pressure method is, that an air stream is lead through a capillary into the process liquid. A sensor measures the pressure which is needed to generate a bubble. (more...).

          Technical data

          Surface tension
          Measuring range10…100 mN/m (dyn/cm)
          Resolution0.1 mN/m (dyn/cm)
          Bubble lifetime
          Adjustable range15…20,000 ms
          Resolution1 ms
          Sample temperature
          Measuring range0…100 °C
          Resolution0.1 K
          Power Supply
          Mains adapter100...240 V
          47...63 Hz
          Battery (Lion, integrated)
          3.6 V / 1,950 mAh
          min. 10 h operating hours
          Power consumption2 W max.
          Interface, Storage, Dimensions, Weight
          USB interfacedata transfer, battery charging
          Display124 x 168 pixel,
          illuminated
          Storage25 values/profile
          Dimensions (WxHxD)75 x 168 x 35 in mm
          Weight of instrument230 g

          Windows-Software

          The Windows-Software SITA-ProcessLog allows an easy control of all functions of the tensiometer with the PC as well as a comfortable management of the saved measuring data.

          Management and graphical analysis of saved measuring data
          Documentation and evaluation of the process and products‘ characteristics
          Simple and easy preparation of measuring reports
          Controlling the measurement via PC in the laboratory
          Simple generation of concentration curves based on defined samples
          For more information click here [..].

          Accessories

          Capillaries
          Type I PEEK - easy manual cleaning for paints 
          and varnishes
          Type II PEEK - for monitoring process liquids
          Type III Glass - for agressive liquids
          Disposal capillaries PTFE - for special cases
          Heating plate with magnetic stirrer
          and stand for SITA DynoTester+
          Double walled glass vessel
          for use with thermal liquid circulator (thermostat) including special cover and insulation
          Sample vessels 50 ml
          1 set = 10 pcs.
          Acid protection kit
          Borosilicate glass protection for temperature probe, glass cover, PE jacket for sensor head or device
          Mini sample vessels - 2 ml
          Power supply
          EURO-plug, UK-plug, US-plug

          Scope of delivery

          - Measuring device DynoTester+
          - Robust suitcase
          - 2 Capillaries PEEK
          - Power supply
          - USB-cable
          - Stand
          - Instrument fastener
          - 2 sample vessels 50 ml
          - Operating instruction
          - Calibration certificate

          SITA pro line t15

          Flexible and compact all-round Tensiometer for analysis and optimization

          Single-Mode
          Quick control of surfactant concentration

          Quick and reliable for control tasks. The device displays a single measuring value at pre-determined parameters.

          Auto-Mode
          Optimal support for process analysis

          Optimal for the analysis of processes and chemicals. Characterization of the wetting behavior of surface active agents.

          Online-Mode
          Easy process monitoring

          Continuous monitoring of manufacturing processes. Automatic measurement of temperature dependencies.

          Product description

          Surface tension measurement – quick and flexible
          The SITA pro line t15 is an all-round talent among bubble pressure tensiometers. The measuring device has a comprehensive bubble lifetime range from 15 ms to 20 s for measuring the dynamic surface tension. It automatically adjusts the chosen bubble exactly without a drift or time-consuming readjusting by the operator.
          The Auto-Mode analyzes the dynamic behavior of the surface tension of surfactant containing liquids. Wetting characteristics of surface active liquids can be analyzed and the optimal bubble lifetime for the concentration control can be easily determined by the operator.
          The Single-Mode carries out a quick measurement of a single surface tension value at a pre-determined bubble lifetime for a reliable control of the surfactant concentration of process liquids
          The Online-Mode is used for a continuous monitoring of process liquids and for determining the temperature dependency of the surface tension of liquids.
          The measuring data can be saved in the Tensiometer SITA pro line t15, transferred to a computer or printed by an optional protocol printer.The software SITA-LabSolution realizes a visual presentation, evaluation and further processing of measuring data.

          Advantages:
          -3 measuring modes (Single, Auto and Online) adapted to different measuring tasks
          -Easy and direct start of measurement
          -Automatic adjustment of bubble lifetime – no drift, no re-adjustment necessary

            Measuring principle


            Like all SITA Tensiometer, the SITA pro line t15 is based on the bubble pressure method for measuring the dynamic surface tension of liquids.
            Therefore, as it can be seen in the picture, an air stream is lead through a capillary into the process liquid and the pressure development for the bubble generation is measured.

            Application


            Determining the optimal bubble lifetime for a control of surfactant concentration
            The picture shows the procedure of how to determine the optimal bubble lifetime for monitoring the concentration of a wetting agent.
            After measuring the dynamic surface tension of samples with different surfactant concentration in the AUTO-mode, the optimal bubble lifetime is chosen to be the maximum difference between surface tension values of the concentration range to be monitored.

            Analysis of the temperature behavior of process chemicals
            in the ONLINE-mode for determining the temperature compensation for monitoring the surfactant concentration.

            Continuous process monitoring
            in the ONLINE-mode for the documentation of process development.

            Quick measurement of surface tension
            for quality control and concentration control.
            For your security
            Our application engineers advise you, if you can use the SITA pro line t15 for application and how to.


            Software

            Laboratory automation with the new Windows-Software SITA-LabSolution
            Automation of laboratory measurements with a wide range of accessories for analysing active ingredients
            Intuitive operation ensures efficient preparation of experiments and
            evaluation of measuring results
            Easy access to all functions of the tensiometer
            Report function for creating measurement protocols and reports
            Controlling a wide range of accessories
            Burette (fluid dosing unit)
            Sampler
            Thermostat
            Magnetic stirrer, (heating) stirrer

            Accessories

            Process Interface
            Easy integration of Tensiometer SITA pro line t15 in a continuous process monitoring.
            Characteristics: potential-free access for controlling the device, current interface for measuring data
            Heating plate with magnetic stirrer
            and stand for SITA pro line t15
            Capillaries
            Type I PEEK – easy manual cleaning for paints and varnishes
            Type II PEEK – for monitoring process liquids
            Double walled glass vessel
            For use with thermal liquid circulator (thermostat) including special cover and insulation
            Sample vessels 50 ml
            1 set = 10 pcs.
            Acid protection kit
            Borosilicate glass protection for temperature probe, glass cover, PE jacket for sensor head or device
            Power supply
            EURO-plug, UK-plug, US-plug

            Technical data

            Surface Tension
            Measuring range10...100 mN/m (dyn/cm)
            Resolution0.1 mN/m (dyn/cm)
            Bubble Lifetime
            Controlled range15 ms...20,000 ms
            Resolution1 ms
            Liquid Temperature
            Measuring range0...100 °C
            Resolution0.1 K
            Power Supply
            Mains adapter100...240 V
            47...63 Hz
            Battery (Lion, integrated)3.6 V/1,950 mAh
            Power consumption2.5 W max.
            Interface, Storage, Dimensions, Weight
            USB-Interfacedata transfer, power supply & charging of battery
            Display124 x 168 Pixel, illuminated
            Storage3 memory areas for Single, Auto and Onlinemeasurements
            Dimensions (WxHxD)75 x 168 x 35 mm
            Weight of instrument270 g

            Grit Feeder


            Grit Feeder  

            Taber Abraser with Model 155 Grit Feeder The Taber® Grit Feeder Attachment is used in conjunction with the Taber Rotary Platform Abraser (Abrader) to evaluate three-body abrasion caused by the destructive action of fine, hard particles.  Originally referenced as the Frick-Taber test, this instrument has been used to determine the wear resistance of flooring products with smooth surfaces.

            Description

            The Grit Feeder is a freestanding instrument that requires a Taber Rotary Platform Abraser (not included) to conduct testing.  The grit distributor nozzle is positioned over the Taber Abraser specimen in front of the right abrasive wheel.  During the test, abrasive grit particles are deposited uniformly and continuously onto the specimen surface.  As the specimen holder rotates, the loose grit particles pass under a pair of S-39 Leather-Clad Wheels.  The resulting rolling action of the particles serves as the abradant and contributes to the physical breakdown of the material.  The vacuum hose from the Taber Abraser is inserted into the base of the Grit Feeder allowing a pickup tube to be positioned such that grit particles and debris are removed.  The operation of the grit feeder is controlled through the Taber Abraser, ensuring that the turntable, grit distribution and vacuum suction are actuated at the same time.
               

            Models

            Two Grit Feeder models are available.
            Taber Grit Feeder Model 255Taber Grit Feeder Model 155Grit Feeder - Model 155 offers a hopper capacity of approximately 1,300 grams.  Mounted on the left side of the Taber Abraser, Model 155 utilizes an alignment guide screw to set the position of the instrument. The grit distributor and vacuum removal nozzle heights are adjusted using a thumbscrew.
            Grit Feeder - Model 255 offers a hopper capacity of approximately 4,500 grams.  An alignment block is incorporated into the base of the Model 255, to ensure the correct location of the grit feeder in relation to the abraser.  A hand crank controls the telescoping feature allowing precise height adjustments and testing of thicker specimens (up to 40mm with the Taber Abraser Arm Height Extension Kit).  With the ability to mount on either the right or left hand side, two instruments can be used in conjunction with Taber's dual Rotary Platform Abraser.
            Note: To use older versions of the Taber Grit Feeder with Taber Abraser Model 5135 or 5155 equipped with the Grit Feeder Control Output connection, a Grit Feeder Control Box (sold separately) is required.

            Abradants

            The standardized abradant supplied with Taber's Grit Feeder is a #240 aluminum oxide grit particle (Model S-41).  Produced specifically for Taber Industries, this aluminum oxide has tighter controls for both particle size analysis and bulk density properties compared to "off-the shelf" aluminum oxide.  To calibrate the rate of flow and to measure the abrasive rate of the abradant, S-38 Standardization Plates are utilized.
            Prior to use, the abrasive grit should be screened through U.S. Standard Sieve No. 80 to break up any conglomerates and to remove any oversized or foreign particulate matter.  Afterwards, dry the grit for 1 hour at approximately 82° C (180° F).  Allow to cool in a temperature and humidity controlled room prior to use.
            To satisfy test method EN 14354 and ISO 24338 Method B, Alodur ESK 240 aluminum oxide grit should be used.  Contact Taber Industries for additional information.

            Evaluation

            The following are commonly used methods for reporting Grit Feeder test results:
            Weight (Mass) Loss - The weight loss test method is a quantifiable method that records the weight loss of your test specimen due to abrasion.  This method of evaluating test results is recommended when the results are to be compared with those of similar materials having nearly the same specific gravity.  Weigh your test specimen before and after testing to obtain the initial and final weight values.  The difference between these two values, Ftotal, is the weight loss.
                  Ftotal = A - B
                  where  A = weight (mass) of specimen before abrasion, mg
                            B = weight (mass) of specimen after abrasion, mg

            Use the following formula to calculate average mass loss, Fm, in milligrams (mg) per 100 cycles:
                  Fm = (Ftotal / n) x 100
                  where  n = total number of revolutions
            When performing the weight loss method, loose particulate may adhere to specimens during testing.  It is critical that you clean off the test specimens as best as possible prior to weighing.

            Taber Wear Index may also be used to present weight loss data.  This measurement is the loss in weight in milligrams per thousand cycles of abrasion.  The lower the wear index, the better the abrasion resistance quality of the material.
                  Taber Wear Index = (Ftotal x 1000) / n

            Cycles to a Specific End Point - The number of cycles required to reach a predetermined end point (e.g. wear through to the substrate).  Alternatively, this could be reported as the condition of the specimen after subjecting it to a specified number of cycles.
            According to test method EN 14254 (Wood based panels - Wood veneer floor covering Annex D Test method to determine the wear resistance), wear generated with the Taber Grit Feeder is evaluated using a transparent template with each quadrant divided into four sectors of 22.5°.  The transparent template is placed on the test piece to determine if there is continuous wear in 12 sectors out of 16; and continuous wear through in 1 sector per quadrant.  If there is not sufficient contrast between the substrate and coating, a contrast marking solution may be used (e.g. water based solution of 1% Methylene or Alkali blue).

            Volume Loss Method - In comparing the wear resistance of materials having different specific gravities, a correction for the specific gravity(s) of each material should be applied to the weight loss to give a true measure of the comparative wear resistance.  The use of this correction factor gives a wear index related to the loss in volume of the material to which it is applied.
            Determine the specific gravity of the material to be tested in accordance with standard practice.  If the specimen is not homogeneous, but possesses a surface that differs from the body or core, determine the specific gravity of the surface alone.  If abrasion is to be carried beyond the surface of the body, also determine the specific gravity of the latter and calculate and report the abrasion resistance of the two components separately.
                  Volume Loss, cm3 = (W1 - W2) / S
                  where  W1 - weight of specimen before abrasion, g
                            W2 = weight of specimen after abrasion, g
                            S = specific gravity

            Depth of Wear Method (Thickness) - Certain test requirements may call for measuring the depth of wear.  To determine this, mark four points on the back of an unabraded sample, 90° apart and oriented 11/2" (38 mm) from the center hole [this will be within the wear path].  Using a thickness gage or micrometer, measure the specimen thickness.  After abrading the sample, repeat the measurements and record the difference.  To compensate for depth differences around the specimen wear path, an average should be computed from the four readings.
            Change in thickness can also be measured using an Optical Micrometer or similar instrument.  Place the measuring device so that it spans both the abraded and unabraded portion of the specimen.  Calculate the amount of wear by measuring the difference between the abraded and unabraded areas in four equadistant points around the specimen, and average the results.
            Alternatively, the average loss in thickness can be calculated by dividing the loss in volume by the abraded area of the specimen.

            Test Methods

            The following link provides a listing of test methods the Taber Abraser (Abrader) and Grit Feeder Attachment satisfies.  Please note, additional accessories may be required.